[vc_row][vc_column][vc_column_text]
Select either of the following guides:
How to install presets on mobile
How to install presets on desktop
[/vc_column_text][vc_separator color=”black”][/vc_column][/vc_row][vc_row][vc_column][vc_column_text]
Mobile Installation Guide
[/vc_column_text][vc_separator color=”black”][vc_column_text]
If you haven’t already please download the FREE Adobe Lightroom Mobile app on your phone.
There are 3 ways to install and use my presets on your mobile either by using your computer or mobile only.
Select either of the following guides:
Mobile Install using desktop/computer (quickest install)
Mobile only install using iPhone
Mobile only install using Android
[/vc_column_text][/vc_column][/vc_row][vc_row][vc_column][vc_column_text]
Desktop download for Mobile *quickest install*
[/vc_column_text][vc_separator color=”black”][/vc_column][/vc_row][vc_row][vc_column width=”1/2″][vc_column_text]
1. Download the FREE Adobe Lightroom Mobile app on your phone.
2. Download your presets to your computer via the download link (you will receive this via email once you’ve purchased my presets).
3. Unzip the ‘@kelseyinlondon_Presets.zip‘ file. For Mac users, simply double click on the file to unzip it.
4. Navigate to the ‘Mobile_Files‘ folder. Here you will find multiple .DNG files – these are the preset files.
5. iPhone/Mac users: use Airdrop to send all of the .DNG files to your mobile from your computer. Alternatives: use Dropbox or iCloud to send these files to your phone.
6. Open the Lightroom Mobile app.
7. Click the Import Photo button ![]() in the bottom right corner.
in the bottom right corner.
8. Select all the .DNG files from your camera roll.
please note: After you complete the above step, the .DNG files will now appear in the Lightroom app as images like below:
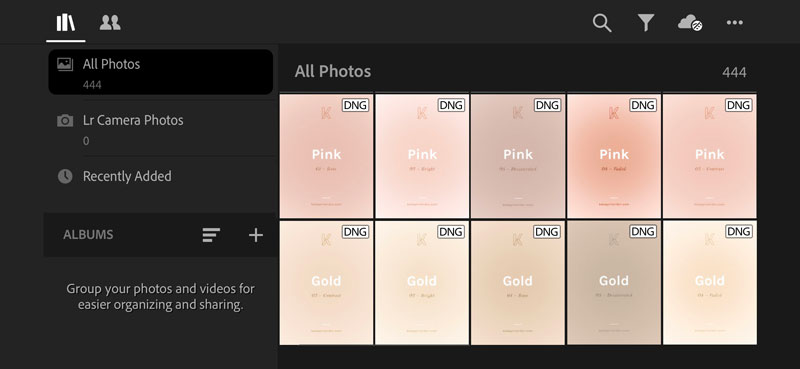
[/vc_column_text][/vc_column][vc_column width=”1/2″][vc_column_text]9. Click on one of the .DNG files/photos.
10. Once selected, tap the 3 dots button ![]() in the top right corner of the screen and select ‘Create Preset‘.
in the top right corner of the screen and select ‘Create Preset‘.
11. Save the preset
– Give the preset a name eg ‘Gold Contrast‘
– Save it to a new group by clicking on the ‘Preset Group‘ drop-down menu. Then click ‘Create New Preset Group‘ and give the new group a name eg ‘@kelseyinlondon‘.
*Make sure you select your new group each time you save a new preset.
– Click this tick button ![]() in the top right corner to save the preset.
in the top right corner to save the preset.
12. Repeat steps 9-11 for each photo until complete.
Your presets should now be ready to use. Click here for instructions on how to edit with my presets.[/vc_column_text][vc_video link=”https://youtu.be/6BSXdayoQdY”][vc_column_text][/vc_column_text][/vc_column][/vc_row][vc_row][vc_column][vc_column_text]
Mobile only download – iPhone
[/vc_column_text][vc_separator color=”black”][/vc_column][/vc_row][vc_row][vc_column width=”1/2″][vc_column_text]
1. Download the FREE Adobe Lightroom Mobile app on your phone.
2. Download the free app iZip (this app will let you unzip files on your iPhone).
3. Download the ‘@kelseyinlondon_Presets.zip‘ from your download link (you will receive this via email once you’ve purchased my presets).
4. Once the download is completed, select ‘Copy to iZip‘.
5. iZip will then ask “Would you like to unzip all files?” click ‘OK‘.
6. Once unzipped, select one .DNG file at a time and then click ‘Open in‘ and select ‘Copy to Lightroom CC‘.
7. Once the file is opened in Lightroom, tap the 3 dots button ![]() in the top right corner of the screen and select ‘Create Preset‘.
in the top right corner of the screen and select ‘Create Preset‘.
8. Save the preset
– Give the preset a name eg ‘Gold Contrast‘
– Save it to a new group by clicking on the ‘Preset Group‘ drop-down menu. Then click ‘Create New Preset Group‘ and give the new group a name eg ‘@kelseyinlondon‘.
*Make sure you select your new group each time you save a new preset.
– Click this tick button ![]() in the top right corner to save the preset.
in the top right corner to save the preset.
[/vc_column_text][/vc_column][vc_column width=”1/2″][vc_column_text]
9. Repeat steps 6-8 for each photo/.DNG file until complete.
Your presets should now be ready to use. Click here for instructions on how to edit with my presets.
[/vc_column_text][vc_video link=”https://youtu.be/1UOaBgIkvCY”][vc_column_text][/vc_column_text][/vc_column][/vc_row][vc_row][vc_column][vc_column_text]
Mobile only download – Android
[/vc_column_text][vc_separator color=”black”][/vc_column][/vc_row][vc_row][vc_column width=”1/2″][vc_column_text]
1. Download the FREE Adobe Lightroom Mobile app on your phone
2. Download the ‘@kelseyinlondon_Presets.zip‘ from your download link (you will receive this via email once you’ve purchased my presets).
3. Open Files by Google and locate the file you just downloaded ‘@kelseyinlondon_Presets.zip‘ and select it.
4. Click ‘Extract‘ to unzip the file, and when it’s finished extracting, click ‘Done‘.
5. Open the Lightroom Mobile app.
6. Click the Import Photo button ![]() in the bottom right corner.
in the bottom right corner.
7. Select and import all of the .DNG files from your downloads.
8. Select one of the .DNG files/photos.[/vc_column_text][/vc_column][vc_column width=”1/2″][vc_column_text]9. Once selected, tap the 3 dots button ![]() in the top right corner of the screen and select ‘Create Preset‘.
in the top right corner of the screen and select ‘Create Preset‘.
10. Save the preset
– Give the preset a name eg ‘Gold Contrast‘
– Save it to a new group by clicking on the ‘Preset Group‘ drop-down menu. Then click ‘Create New Preset Group‘ and give the new group a name eg ‘@kelseyinlondon‘.
*Make sure you select your new group each time you save a new preset.
– Click this tick button ![]() in the top right corner to save the preset.
in the top right corner to save the preset.
11. Repeat steps 8-10 for each photo until complete.
Your presets should now be ready to use. Click here for instructions on how to edit with my presets.[/vc_column_text][/vc_column][/vc_row][vc_row][vc_column][vc_separator color=”black”][vc_column_text]
Desktop Installation Guide
[/vc_column_text][vc_separator color=”black”][/vc_column][/vc_row][vc_row][vc_column][vc_column_text]Here’s my quick guide on how to install my presets either using Lightroom Classic or Lightroom CC on Desktop. Please note: You will need an Adobe Creative Cloud subscription to use the desktop version of Lightroom.
Lightroom CC install
1. Download your presets to your computer via the download link.
2. Unzip the ‘@kelseyinlondon_Presets.zip‘ file. For Mac users, simply double click on the file to unzip it.
3. Open Lightroom CC on Desktop
4. Select the Edit button on the right panel. Or simply press the ‘E‘ key on your keyboard.
5. Click on ‘Presets‘ – it’s located at the bottom of the editing section.
6. Click on the three dots to the right of ‘Presets‘ and then choose ‘Import Presets‘
7. Navigate to the ‘@kelseyinlondon_presets‘ folder (most likely located in your downloads folder) and go to the ‘Desktop_Files‘ folder
8. Select all the .xmp files within this folder and then click ‘Import‘
9. You presets are now ready to use in the ‘Presets‘ section. Click here for instructions on how to edit with my presets.
Lightroom Classic install
1. Download your presets to your computer via the download link.
2. Unzip the ‘@kelseyinlondon_Presets.zip‘ file. For Mac users, simply double click on the file to unzip it.
3. Open Lightroom Classic on Desktop
4. In the left panel, click on ‘Presets‘
5. Click on the ‘+’ button to the left of ‘Presets’ and choose ‘Import Presets‘
7. Navigate to the ‘@kelseyinlondon_presets‘ folder (most likely located in your downloads folder) and go to the ‘Desktop_Files‘ folder
8. Select all the .xmp files within this folder and then click ‘Import‘
9. You presets are now ready to use in the ‘Presets‘ section. Click here for instructions on how to edit with my presets.
[/vc_column_text][/vc_column][/vc_row]