How to Make Reels Go Viral on Instagram
I know everyone rolls their eyes when an influencer says “I’ve been getting SO many questions about…”. But really, I genuinely have.
The question I get asked every single day, without fail, is: How do I make Reels go viral? Which I find very flattering. I’m proud of the videos I’ve created and I’m grateful others seem to resonate with them.
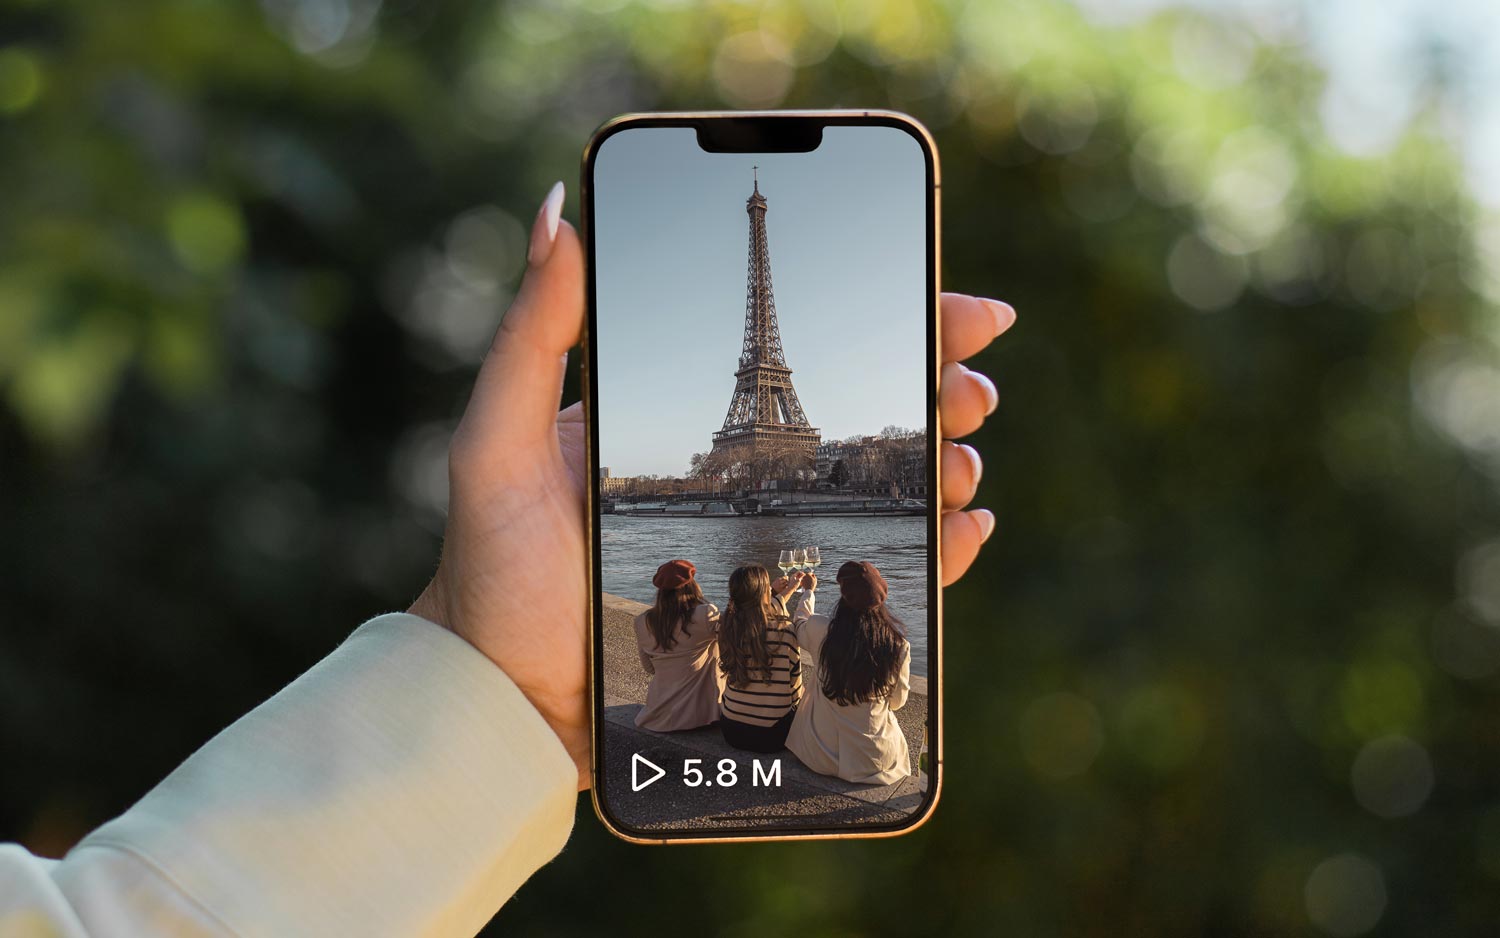
Thanks to Instagrams Reels, you can reach millions of people regardless of your follower count.
Over the past 2 years, I’ve gained over 300,000 new Instagram followers on my account @kelseyinlondon, with an audience of over 1 million followers across my social media accounts — all thanks to Reels.
In this post, I’ll be covering everything you need to know about how to make Reels go viral.
From what equipment I use to film, to how to find trending audios and down to the specifics of my upload settings.
I’ve tried to cover as much as possible in this guide so if there is anything specific you need advice on, please leave a comment below and I’ll do my best to help 🙂
Thank you for your support
This article contains affiliate links. If you purchase something I’ve recommended, I’ll earn a small commission at no extra cost to you. I really appreciate your support and I hope this guide helps you ♡
We’ve all seen accounts we love go viral because of Reels. It’s an exciting time on social media and we would be lying to ourselves if we said we didn’t want a slice of the pie.
Back in 2021, I was very reluctant to start posting video content. I’m a passionate photographer through and through. I thought TikTok and Reels were only for people who could dance, and I can’t dance to save my life.
How wrong I was! Video content is SO much more than hitting the woah or lip-syncing. With video content, you can inspire a shit load of people to feel more confident, start a DIY project, cook a recipe or travel to a destination they’ve never even heard of before.
How to make reels go viral on Instagram
Best Editing Apps for Reels
CapCut is one of the best editing app for Reels. It’s a free editing app available on mobile and they have a free desktop version too so you can edit Reels on your computer.
I use both Adobe Premier Pro and CapCut on my computer to edit my Reels as I find it so much easier to edit precisely using a mouse rather than my finger.
However, if I’m editing on the go I will use Adobe Rush or CapCut on my mobile.
InShot, VN & Splice are other great apps you can use on your phone to edit Reels.
Unless you absolutely have to, avoid editing within the Instagram app. It’s a lot more time-consuming, it’s buggy and you can risk losing all your drafts.
How do you edit the colour of Reels?
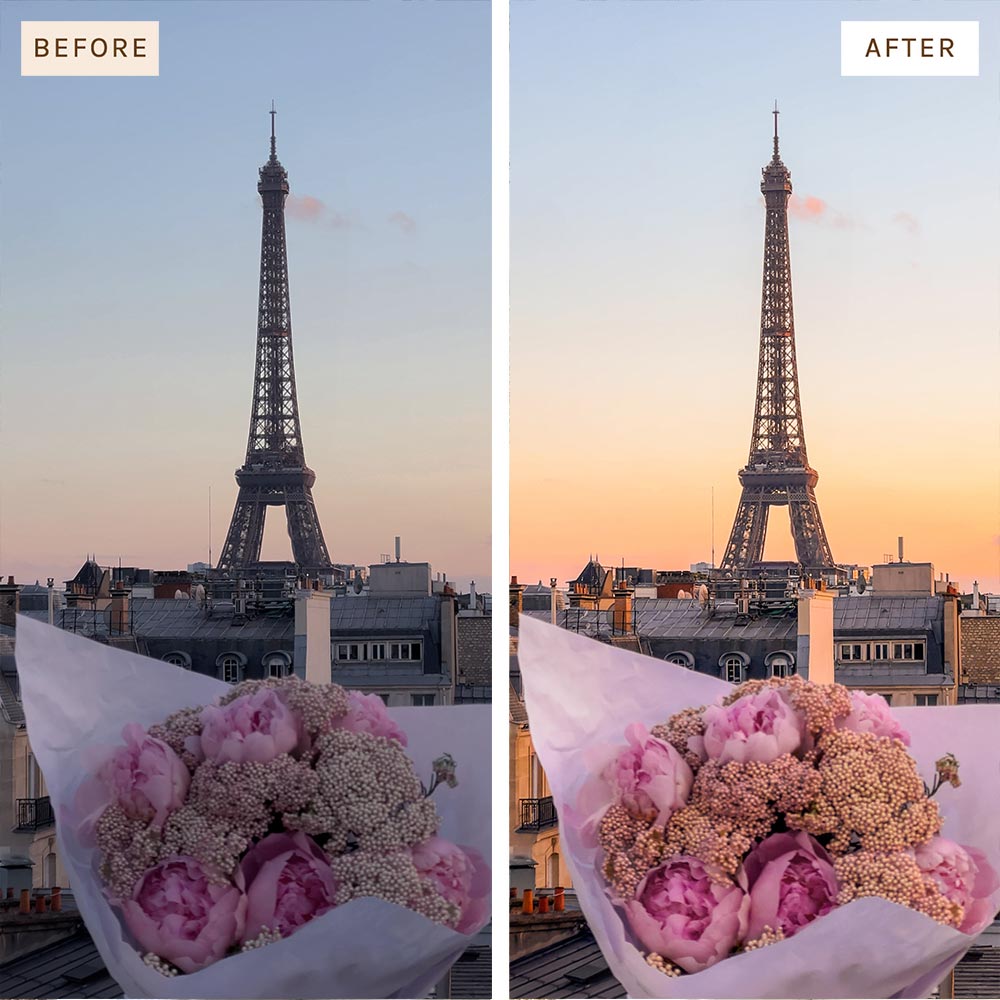
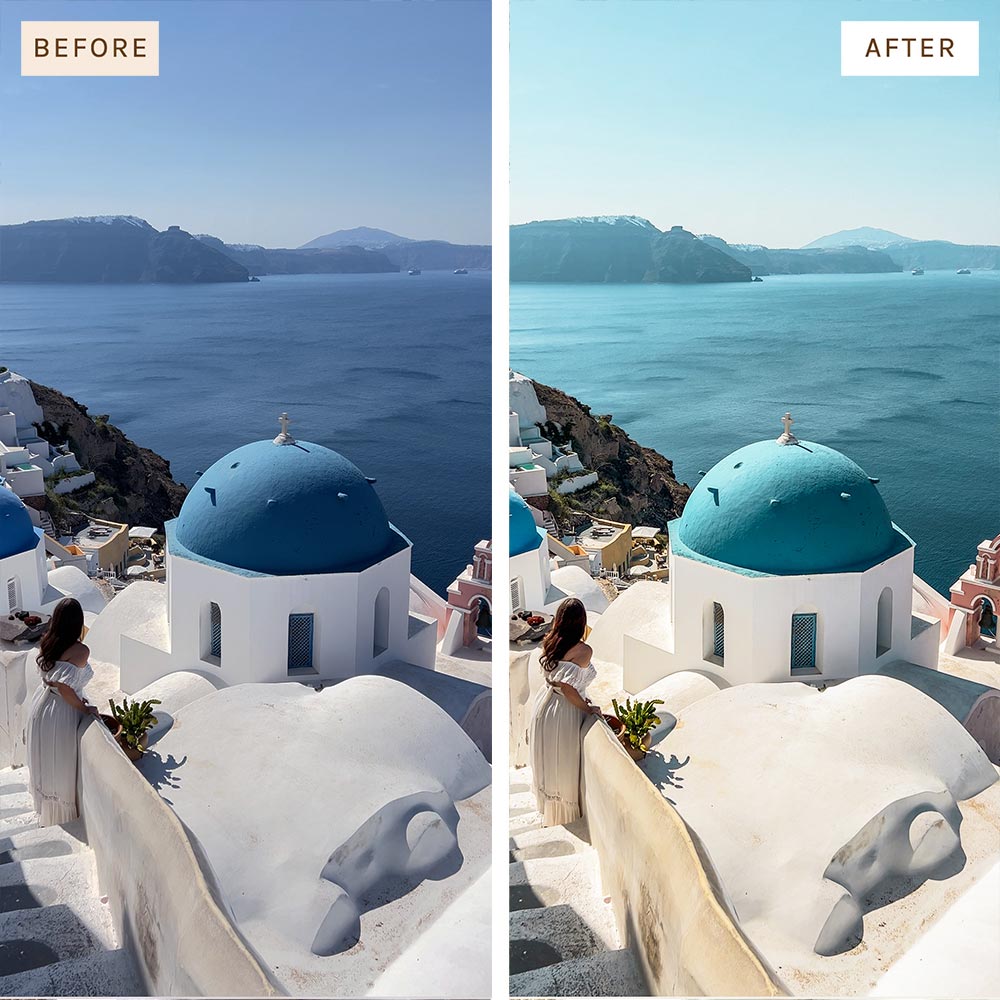
Editing the colour and brightness of a video is a step that shouldn’t be missed when making Reels.
Look at how the below video files looked originally, they are overexposed and flat.
With a few quick editing adjustments, I can bring back the vibrancy and depth. (See reference images below).
I’ve created a range ready made Video Filters that you can use to transform your videos in just one simple click.
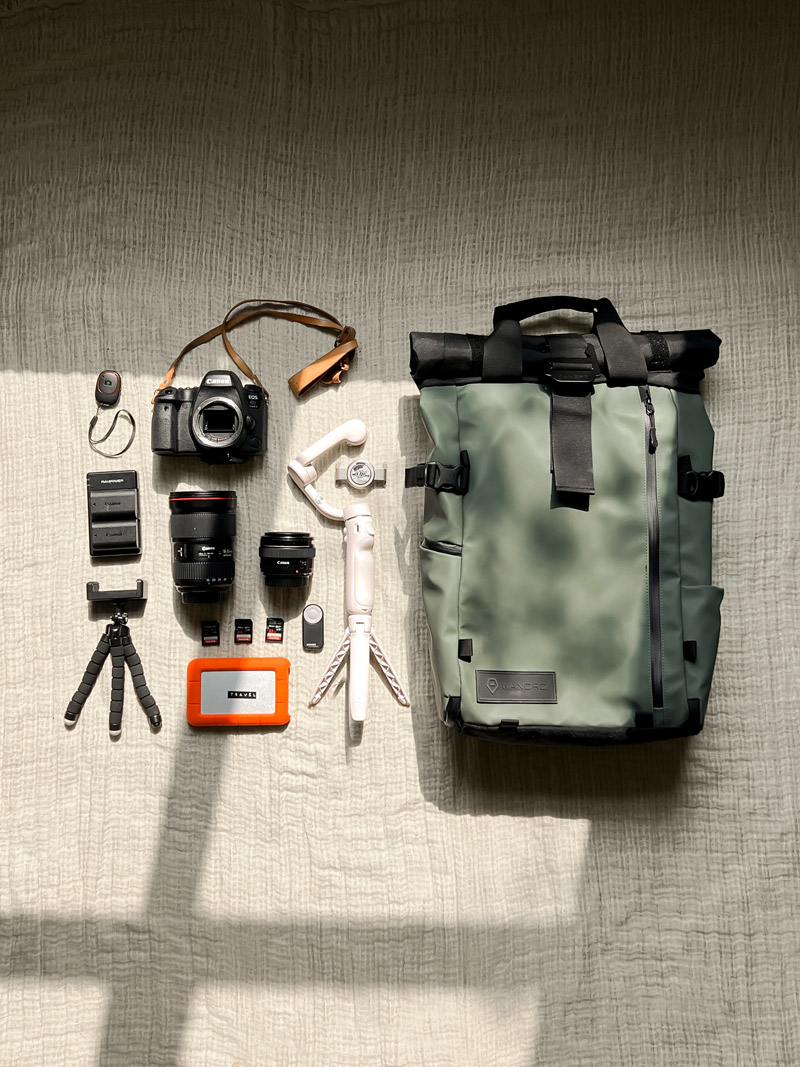
Best Camera for Instagram Reels
You really don’t need a fancy or expensive camera to make beautiful, viral Reels. The best camera for filming is the one you already have. And for most of us, that’s our smartphone.
I film all of my reels using both my iPhone 14 Pro Max & iPhone 16 Pro Max.
I find the iPhone 16 is considerably better in low light conditions compared to the 14, however I still love using my 14 to capture shots using the x3 telephoto lens. The x5 telephoto lens on the 16 is amazing too, I just prefer the crop of the x3. Ideally the next iPhone would have both the x3 and x5 telephoto lenses!
I also loved filming on my previous iPhone 13 Pro Max and still post a lot of Reels that feature footage from this phone.
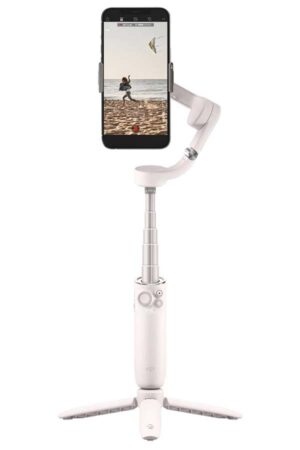
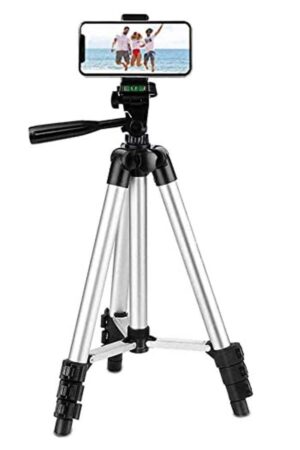
I also recommend using a gimbal. This nifty little device is what I use to make my videos look super smooth.
You can get one for under £100 on Amazon. This is the exact one I use which has an inbuilt tripod and selfie stick.
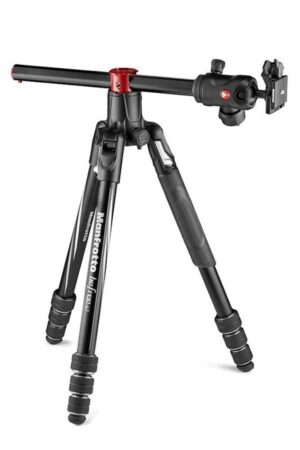
A decent tripod will also help you film from various different angles and is what I use to film transitions. This is my go to tripod that I use with both my dSLR camera & iPhone.
Settings for High Quality Reels
If you’ve watched my Reels, you’ll notice they are very high-quality, sharp and non-pixelated.
The number one mistake I see people make is not wiping their iPhone lens before filming, it makes such a difference. I see a lot of videos that look blurry because there is still grease/dust on the camera lens.
The second thing that’ll improve the quality of your Reels is your camera, exporting & upload settings. Below are the exact settings I use:
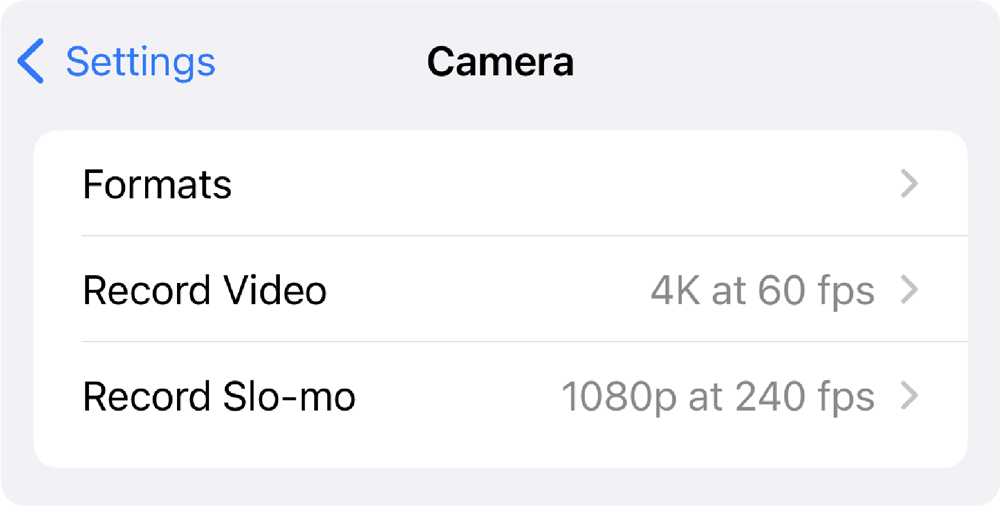
iPhone Camera Settings for Best Quality
Make sure to record all iPhone videos in 4K at 60 fps (frames per second).
To change these settings on iPhone, go to:
Settings > Camera > Record Video and change to 4K at 60 fps.
Make sure to have HDR Video turned off – unfortunately most editing apps do not support HDR format.
Best Export Settings for Instagram Reels
Export all your edited Reels to 4k at 30 fps. Depending on what app you use to edit, you’ll be able to select these settings once you’ve clicked export or share video.
How to Upload High Quality Reels on Instagram
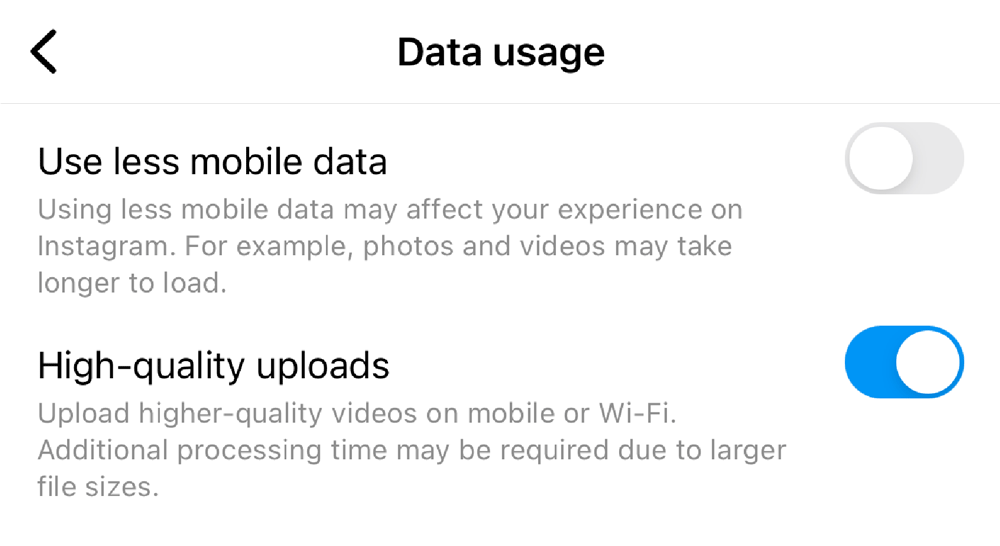
Make sure you have high-quality uploads turned on.
To do this on Instagram, go to Settings > Account > Data Usage and make sure High-quality uploads is turned on.
How to Find Trending Audio on Instagram
It’s important to note that you do not need to use trending audio to go viral on Instagram. It can help but it’s not crucial. In fact, a lot of my most viral Reels have used my original audio.
The most important thing is to focus on the quality, content and value of your Reel.
That being said, it’s an overwhelming task to pick a song for a Reel, there are literally millions to choose from. So looking at trending audio is a great place to start with your editing process.
The best way to find trending audio on Instagram is within the Instagram app itself.
From your home feed, swipe right and select “Reel”. Then click the music icon 🎵, this will take you to the music page. Under both the “For you“, “New releases” and “Original audio” you will find a bunch of trending audio.
Another way to find trending audio on Instagram is to simply open the Reels tab and start scrolling. As you scroll, make a note of any audios you find with the trending arrow sign and save them.
If you don’t see the trending arrow sign, make another Instagram account with a separate email and see if it’s visible on your second account.
More tips for finding trending audio
Look for audios that have less than 15,000 videos on them. If they have over 100,000 videos, it’s going to be hard to rank on that audio and appear at the top of that audio page.
By the time a trending audio has over 200k videos, trust me, everyone is sick to death of hearing it.
Pay attention to the songs and audios you hear on your TikTok For You Page. Audios that trend on TikTok usually trend on Instagram two weeks later. You can be ahead of the curve on Instagram if you’re up to date with TikTok trends.
Be aware and stay tuned to music news. Any time a major artist releases a new album (think Drake, Harry Styles or Beyoncé), their songs are always trending on Instagram.
Make a note of any upcoming album release dates and make sure you use those songs on your Reels ASAP.
Don’t just use an audio just because it’s trending. It’s really important that it actually fits the vibe of your video.
How to Edit with Trending Audio
Of course, you can easily add your trending audio within the Instagram app. However, if you want to easily edit on beat to the music or adopt my “Create once, post thrice” method, you’ll want to add audio to your videos using an external app.
So how do you do this?
Once you have found trending audio on Instagram, screen record that song. Then import that video file in your editing app and extract/separate the audio.
Then make sure to edit on beat to the song – more instructions for this below.
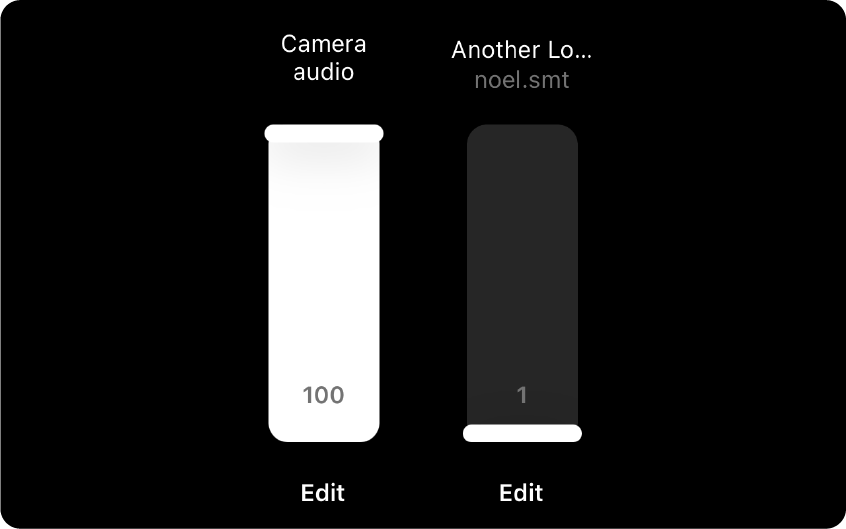
Once complete, when you go to upload on Instagram, go to the audio page and upload your video from there.
On the music settings, put your camera audio at 100 and the trending audio at 1.
This means you don’t need to waste any time trying to sync up the audios – it’ll drive you crazy.
Your Reel will now appear on the trending audio page. It will not work if the trending audio is set to 0 – if you do this, your Reel will upload as an original audio.
How to Edit on Beat to Music
Making sure your video is on beat and in sync to a song is crucial. Watching a Reel that is on beat is just so much more satisfying than a Reel that is off beat. It encourages viewers to watch your Reel multiple times, which will help make your Reel go viral.
Within both the Instagram and TikTok apps, there is inbuilt editing functionality that allows you to insert clips and have them appear on beat without any additional effort.
This feature Is available in CapCut too. I’ve personally never used this feature as I prefer to edit the majority of my videos in Adobe Premier Pro.
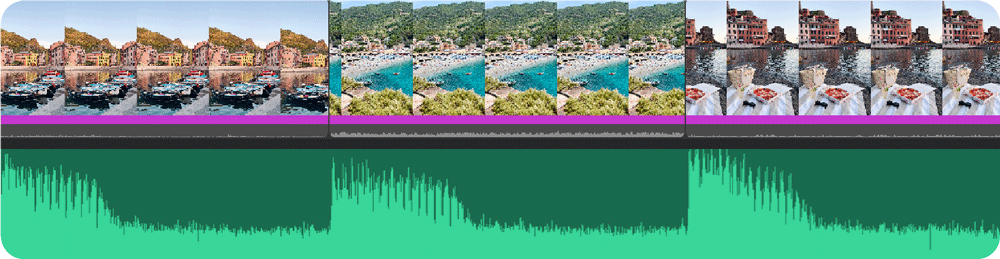
The way I edit on the beat is by looking at the waveform for an audio track and seeing where the beat/spike is. I line up each video clip with the spike of the music beat (see example below).
This is easier for some songs compared to others, so sometimes I have to do this by ear. This is something that will become easier with practice.
Content Strategy For Reels
If you want your Reel to go viral, the content of your video has to be valuable. Valuable Reels are either educational, informative, inspiring, entertaining or relatable.
Before creating a Reel, make sure you ask yourself: what value will this video give? If you’re just posting for the sake of posting, then chances are it will be very difficult for your Reels to ever go viral.
Create with purpose and passion and an aim to enrich the lives of the viewers watching your video.
By now, you should have already identified your niche. I’ve previously talked about the importance of having a niche on Instagram.
If you normally post recipe videos and start uploading trending dance videos, then you might go viral for all the wrong reasons. You’ll also risk gaining followers who aren’t interested in your foodie content.
Stick to your niche and let that guide what kind of content you should create.
Best Hooks for Instagram Reels
If you want people to watch your Reel, it needs to have a HOOK. Something to entice viewers to actually stick around and watch the full video.
This is why the first two seconds of your Reel are SO important. You want to grab someone’s attention so they don’t scroll past your post.
Make sure your first clip is the most visually exciting and eye-catching video.
If it’s relevant, add text or a CTA (call to action) to the start of your video to let viewers know what it’s about. Some examples include:
You HAVE to try this 5-minute recipe
5 ways to style a blazer
My secret for taking perfect photos
10 vegan restaurants in London
Easy cat eye makeup tutorial
My biggest regret when it came to starting my business
3 must-have gadgets for new mums
Do you remember these hair trends from the 90s?
Ikea Furniture Upcycle Ideas
Optimal Instagram Reel Length
Your Reel should be no longer than 20 seconds and ideally between 7—15 seconds long.
Let’s face it, social media has ruined everyone’s attention span so you need to get your point across quickly before they lose interest.
I only recommend creating Reels between 30—90 seconds if you are creating a video that gives someone a reason to keep watching.
For example: a very detailed DIY tutorial with step-by-step instructions, a 7-day Thailand travel itinerary or a hilarious, captivating story time.
Best Time To Post Reels on Instagram
Posting on Instagram should suit your schedule. There is no magic time to post Reels on Instagram that will increase engagement or views.
However, with video content, it’s helpful to be mindful of when you think viewers will actually have time to watch a video with audio.
People are more likely to watch videos in the morning on their office lunch break, in the evening after work and on weekends.
Be mindful that a lot of people watch Reels without audio (they may be in bed next to their sleeping partner or around children). So make sure your Reels have closed captions for those who are hard of hearing or watching without audio.
As always experiment and see what posting times work for you.
How Many Reels Should I Post a Day?
When it comes to Reels, posting consistently is really vital if you want a chance of going viral.
Not every Reel you post is going to go viral. Think of Reels like darts. The more darts you throw at the board, eventually one will hit bullseye.
The more Reels you upload, the more chances you’ll have for it to go viral – but I think that’s pretty obvious already.
I recommend aiming to post 3 to 5 Reels a week, depending on your schedule.
Sure, you’d have better results if you posted two Reels a day, but you’d also have no social life or time to look after yourself. Do the best you can with the time you have available.
It’s more important to be consistent than to post 20 times in one week and then disappear for 2 months because you burnt yourself out.
Remember to take healthy social media breaks. I don’t tend to post on weekends and if I’m away on holiday, you won’t see me posting at all.
Please note that it’s very normal for your views on Instagram to be wildly inconsistent. Take a look of my Reel views below, they vary from over 2 million to 20k views within the same week.
Cross Posting Reels to other platforms
“Create once, post thrice” is a motto I came up with to explain my social media strategy.
What do I mean by this? I create one video and post that exact same video on three different platforms: Instagram, TikTok and Pinterest.
I simply do not have time to create unique content for each different platform – and I’m sure you don’t either – so this is how I make the most of my Reels.
I create with Instagram in mind first as it’s my main platform. The process of posting that same video to TikTok and Pinterest is only an additional 10 minutes of my time.
Don’t just leave your videos sitting on your camera roll or hard drive. Make sure to upload your Reels to as many platforms as you can for maximum visibility.
The benefit of editing your videos in an external app (like CapCut or InShot) is that you don’t have to worry about removing any annoying Instagram or TikTok watermarks.
How to Write Captions for Reels
As Reels are a lot more time-consuming to create compared to photos, people often tend to forget about the caption.
Captions shouldn’t be an afterthought.
A caption that has value will get a lot of saves. The more saves and shares a post has, the more likely Instagram will push your Reel to the Explore/Reels tab, resulting in more views.
Encourage saves by having as much information as possible in the caption. If you’re a travel blogger, this could be a summary of recommendations for the city you’re featuring in your video. If you’re a fashion influencer, in the caption you can list all the items you are wearing.
Captions are also searchable, like Google. So it’s important to make sure your Reel captions have keywords.
Again, think about what people would search for. “Neutral Outfit Ideas” “Dog-Friendly Hotels” “Sustainable Clothing Brands”. Don’t just let your video do the talking, make sure your captions are as descriptive as possible.
Best Hashtags for Reels
Just like captions, hashtags are equally as important. While Instagram doesn’t give us the insights on exactly how much reach we get on a Reel through hashtags, they do help with reach.
I’ve had a 1-on-1 training call with someone who works at Instagram and they confirmed that hashtags do matter as they help Instagram work out what your video is about. The most common advice is to use around 5-8 hashtags on your Reel.
Only use hashtags that relate directly to the content of your Reel.
For example if I was posting a Reel “10 best Eiffel Tower Photo Spots in Paris” – I would use the hashtags #eiffeltower #paris #photographytips #france.
Avoid using saturated and generic hashtags like #reels #creator #explorepage. Don’t be spammy with hashtags, instead focus on searchable keywords and phrases in your caption.
Check out my detailed guide on how to find the best Instagram hashtags.
Why aren’t my Reels going viral?
Honestly, there could be many reasons why. Your video was a bit dull. You didn’t wipe your camera lens before filming. Your audio sync was off beat.
I think we can all honestly say there is always room for improvement. But maybe you’ve tried absolutely everything and you feel like you’re still not getting anywhere?
I want to talk about privilege for a second as I think it’s so integral when it comes to who is successful on social media. Let’s not beat around the bush here: if you’re white, slim and beautiful – you won’t need to make much of an effort to go viral on Instagram. The system works in your favour.
The system also works against marginalised groups. It’s unfair and it’s why representation and inclusion matter. It’s so important we strive for this in our communities both online and offline.
There is also privilege on social media when it comes to money. If you can afford to buy designer handbags and stay in luxury hotels, you have more chances of going viral.
There is also time privilege. If you have more time to film & edit, you have more chances of going viral. It’s not fair to compare a single working mother of three to a uni student who lives with their parents.
The reason I am saying this is a reminder to not compare yourself to others.
Be patient, work hard at your craft and remember that there is simply no one else like you. That’s the magical thing about the internet is that you are always going to find people who care about you.
Your Reel doesn’t have to reach 1 million people for it to matter. Even if it reaches 1000 or 100 people, that’s still a lot of bloody people!
Learning videography & video editing is a skill that takes people literally years and years to master. It’s a whole different ball game to taking photos.
Be kind to yourself, you will get better with practice.
How to Get 10k Followers on Instagram
Looking for more ways to gain followers on Instagram? In this guide, I cover the basics on how to get Instagram followers organically, as well as sharing my tried and tested tips & tricks.


Honesty the tip about wiping lens is life changing haha . I’ve only discovered it recently and it made huge difference.
Lovely post!
Honestly same! I literally wipe everytime I’m about to film just in case xx
Thank you for sharing, love your reels. What app do you use to put your text over your reels? I’ve noticed you do not use the standard Instagram text.
I use Adobe Rush 🙂
Hi – thanks so much for all this. I have two basic questions but I tend to spend way to much time doing this…. How do you get the videos and images from your phone to Adobe Rush on your computer? I have an iPhone but a Microsoft computer and I find the cloud is also sooo slow and then I have to download to my computer and then save in folders and upload into my video editing platform. Any tips? Also, how do you store all your content on your phone? Like do you have an archiving process so that you download all the content on your phone to hard drive? As you know, shooting in 4K takes so much more space so I find my space filling up so much faster. Any suggestions would be super helpful?
I aidrop all my videos from my iPhone to my iMac or MacBook, it doesn’t take long as I don’t use iCloud so the videos don’t have to download. I then sort them into folders on an external harddrive. To make them easier to find I sort by destination (travel) or by years & months.
Okay this has been so extremely helpful!! My only question now is how do you post reels that don’t get compressed by Instagram?? Mine compress so bad even with changing the settings in Instagram. I have not been able to fix that! My videos look great, and then I post and they look awful:( btw I’m loving your reels! They are so stunning!
Thanks so much! Do you film & export your videos as 4k? What app do you use to edit your reels?
I’ve never had an issue with my videos being compressed. If you can provide some more info hopefully I can help 🙂
I’ve just discovered your account as I’m currently in Italy – in Lake Garda atm with a couple of days in Venice next week. (I’ve just retired so have the time). Oh this was such a refreshing read as I haven’t been long to Insta so reels were as new as everything else. Thanks for sharing such great tips.
Hi! How do you do the “slow-mo” look on your reels/videos? I like that its very cinematic. Could you give some tips on how to take videos like that?
Love this in depth guide, thanks so much. I have one question – how do you get your videos to look so smooth and slowed down? Do you film them like that or do you edit it afterwards? Thanks x
Hey Kelsey, such a helpful blog post thanks so much for sharing! I love the fonts you use on your Instagram Reels and they look different to the ones on the app. Where do you get your fonts?
Thanks,
Jess
Thank you Kelsey! It helps me a lot!
Wow I don’t usually read blogs, but yours captivated me from the set go! I am so impressed! I’m sending all my PR and social media manager friends through to your website. Your information has been so helpful! Thank you 😁❤️.
Thank You so much for Your beautiful work and amazing information You share!
I just love each and every of Your video.
Thank You!!!
Hello, thank you so much for this all useful tips! I still have a question about! How do you write these names? Is it app or something? Or any special
This post about making reels on Instagram is really insightful! It’s impressive how much potential there is in Reels to reach a wide audience, regardless of your follower count or social status. It’s inspiring to see how they’ve gained so many followers through Reels in just a year. I’m definitely going to take note of their tips on equipment, editing, and finding trending audios. Excited to give it a try.
Hey thanks so much for this, it is so so helpful.
Just wondering what resolution you upload to for photos and reels? Also what format?
Thanks so much for your help!
Hi Chloe, you can find my export settings for videos here: https://kelseyinlondon.com/how-to-make-reels-go-viral/#quality
For photos I don’t compress any of my images and just upload them as is 🙂